Blackboard Integration
Overview
This document will hep guide SmarterSurveys clients through the process of setting up, configuring and using the SmarterSurveys BasicLTI integration with Blackboard Learn. This document is intended for Blackboard administrators.
There are three available options for integration with Blackboard:
- Course Tool: The course tool allows the Blackboard administrator to include a tool within the Tools section of each course. This tool will perform a Single Sign On (SSO) for the user directly into the SmarterSurveys system bypassing the need for authentication.
- SSO Launch: The SSO Launch option allows the Blackboard administrator to place a module within the system that can be place on the Institution dashboard and/or Course dashboard that contains a SSO link directly into the SmarterSurveys system.
- Detailed Module: The Detailed Module option allows the Blackboard administrator to place a HTML module within the system that can be place on the Institution dashboard and/or Course dashboard that contains information about open and available surveys for students as well as response rates and report access for faculty. This option provides a rich user experience with SmarterSurveys all from within the Blackboard module.
Prerequisites
All options require a valid integration key and access code key from SmarterSurveys. These keys are available free of charge and available upon request. Please contact your account manager to setup a new integration.
Course Tool
- Blackboard Learn 9.1 SP4 or later
- Blackboard user Batch IDs must match Student or Faculty ID sent to SmarterSurveys.
SSO Launch
- Blackboard Learn 9.0 or better
- SPV Software BasicLTI Building Block
Detailed Module
- Blackboard Learn 9.0 or better
- SPV Software BasicLTI Building Block
Installation
Course Tool
Installation of the course tool utilizes the Blackboard BasicLTI Provider Tool Building Block including in versions 9.1 SP4 or later. No third party building blocks are required to use this feature. This feature allows Blackboard to pass SmarterSurveys the batch_id for a logged in user. SmarterSurveys looks this ID up within our system and if found, signs the user in and pushes them to the home screen within SmarterSurveys.
Setup of Basic LTI Provider
- Log into Blackboard as a System Administrator
- Switch to the System Admin tab
- Select the link Building Blocks from the Building Blocks module
- Click on the link Basic LTI Tool Providers
- Click the button Register Provider Domain
- For the Provider Domain Status, enter or select the following:
- For Provider Domain enter smartersurveys.com
- For Provider Domain Status, choose Approved
- For the Default Configuration, enter or select the following:
- For Default Configuration, set to Set globally
- For Tool Provider Key, enter the key provided by SmarterSurveys.
- For Tool Provider Secret, enter the secret key provided by SmarterSurveys.
- For Institution Policies, enter or select the following:
- For Send User Data, set to Send user data only over SSL
- For Send Context Identifiers As, choose Batch UID
- You can optionally set Show User Acknowledgment Message based on your institutional policy and preferences. This will notify and confirm with the user before opening the SmarterSurveys system.
- Submit the form to save your selections.
This will authorize Blackboard to access smartersurveys.com and to provide information to us using the BasicLTI specification. It also sets the access key and secret for your integration.
Manage Placements
Now that you have authorized Blackboard to send BasicLTI data to SmarterSurveys, you can manage where the tool is available within Blackboard.
- Click the down arrow next to smartersurveys.com to open the context menu
- Click the Manage Placements link
- Click the button Create Placement
- For Placement Information, enter or select the following:
- Enter a Label for the tool. This is how it will show up to users. Some good examples could be "End of Course Evaluations" or "SmarterSurveys Evaluations", etc.
- Provide a Description for the tool.
- Enter a unique Handle
- Select Student Tool for the type
- The SmarterSurveys icon can be obtained from http://images.smarterservices.com/logos/S%20Icon/web/s_icon_trans_green_200.png
- For the Tool Provider Information, enter or select the following:
- For Tool Provider URL, enter http://api.smartersurveys.com/ltilaunch
- The Key and Secret should be greyed out since these were provided in the Provider setup above.
- Submit the form to save your selections.
The SmarterSurveys tool should now be available via the tool menu in each course.
SSO Launch
As a prerequisite, the SSO Launch requires that you have installed and activated the BasicLTI Tool Building Block provided by SPV Software. More information about this building block including installation instructions can be found at http://www.spvsoftwareproducts.com/bb/basiclti/ . This building block can be installed on version 9 or later.
Setup of BasicLTI Tool
- Log into Blackboard as a System Administrator
- Switch to the System Admin tab
- Select the link Basic LTI tools from the Tools and Utilities module
- Click the button Register New Tool
- For the Name, enter or select the following:
- For Name, enter a name that will be used for the module. Some good examples are "End of Course Evaluations" or "SmarterSurveys Survey System".
- For the Connection Details, enter or select the following:
- For Launch URL, enter the following URL: https://api.smartersurveys.com/ltilaunch
- For Tool Provider Key, enter the key provided by SmarterSurveys.
- For Tool Provider Secret, enter the secret key provided by SmarterSurveys.
- For Extension Services, enter or select the following:
- For Outcomes, set to Not used by tool
- For Memberships, choose Not used by tool
- For Setting, choose Not used by tool
- For Outcomes, set to Not used by tool
- Submit the form to save your selections.
Edit Data Settings
- Click the down array next to the name of the registration you created in the previous step.
- In the context menu, click the link for Edit Data settings
- For Context Data, enter or select the following:
- Check Context ID
- For Personal Data, enter or select the following:
- For User ID, choose Required by tool
- For Value to use for user ID, select the value that represents the Student and Faculty ID uploaded into the SmarterSurveys system.
- For User name, choose Not used by tool
- For Email, choose Not used by tool
- All other selections can be left at the default.
- Submit the form to save your selections.
Edit Launch Settings
- Click the down array next to the name of the registration you created in the first step.
- In the context menu, click the link for Edit Launch settings
- For Connect to Tool Options, enter or select the following:
- Select your option for Open tool in.
- Frame - Will open SmarterSurveys within the Blackboard interface. *Recommended option
- New Window - Will open SmarterSurveys in a new browser window.
- iFrame - Will open SmarterSurveys in a modal window within the page that the link resides.
- Select your option for Open tool in.
- Submit the form to save your selections.
Enable the Tool
- Click the down array next to the name of the registration you created in the first step.
- In the context menu, click the link for Enable
Your tool is now setup and enabled.
Creating a SSO Launch Module for Use in Blackboard
- Log into Blackboard as a System Administrator
- Switch to the System Admin tab
- Select the link Tabs and Modules from the Communities module
- Click the button Module
- For the General Properties, enter or select the following:
- For Title, enter a name that will be used for the module. Some good examples are "End of Course Evaluations" or "SmarterSurveys Survey System".
- For Module Type, select Basic LTI tool
- For Module Category, select My Blackboard
- Select preferred options to give a user the ability to personalize and detach the module.
- For the Availability, select your preferred options for availability on where it is available and who can view it.
- To add it into the institution you need to enable System Availability
- To add it into a course, you need to enableAvailability for Use on a Course Module Page
- Enable Allow Asynchronous Loading.
- You can set Date and Time Restrictions if you only what this tool available to students and/or faculty during the administration period.
- Submit the form to save your selections.
- You will be taken to the Admin page for the newly created module.
- For Content details, enter or select the following:
- For Name of existing tool, select the tool that you registered by the Setup of BasicLTI Tool section above.
- Check Allow launch?
- Check Launch button?
- Submit the form to save your selections.
Once the module has been created you can include it within the Institution by default or allow instructors to include it in their courses. There are many options for where this link can be inserted, if it can be moved, the default location, etc. Refer to your Blackboard help for specifics on how to add a module.
SSO Launch Link Screenshot

Detailed Module
As a prerequisite, the Detailed Module option requires that you have installed and activated the BasicLTI Tool Building Block provided by SPV Software. More information about this building block including installation instructions can be found at http://www.spvsoftwareproducts.com/bb/basiclti/ . This building block can be installed on version 9 or later.
Setup of BasicLTI Tool
- Log into Blackboard as a System Administrator
- Switch to the System Admin tab
- Select the link Basic LTI tools from the Tools and Utilities module
- Click the button Register New Tool
- For the Name, enter or select the following:
- For Name, enter a name that will be used for the module. Some good examples are "End of Course Evaluations" or "SmarterSurveys Survey System".
- For the Connection Details, enter or select the following:
- For Launch URL, enter the following URL: https://api.smartersurveys.com/ltimodule
- For Tool Provider Key, enter the key provided by SmarterSurveys.
- For Tool Provider Secret, enter the secret key provided by SmarterSurveys.
- For Extension Services, enter or select the following:
- For Outcomes, set to Not used by tool
- For Memberships, choose Not used by tool
- For Setting, choose Not used by tool
- For Outcomes, set to Not used by tool
- Submit the form to save your selections.
Edit Data Settings
- Click the down array next to the name of the registration you created in the previous step.
- In the context menu, click the link for Edit Data settings
- For Context Data, enter or select the following:
- Check Context ID
- For Personal Data, enter or select the following:
- For User ID, choose Required by tool
- For Value to use for user ID, select the value that represents the Student and Faculty ID uploaded into the SmarterSurveys system.
- For User name, choose Not used by tool
- For Email, choose Not used by tool
- All other selections can be left at the default.
- Submit the form to save your selections.
Edit Launch Settings
- Click the down array next to the name of the registration you created in the first step.
- In the context menu, click the link for Edit Launch settings
- For Connect to Tool Options, enter or select the following:
- Select your option for Open tool in.
- Frame - Will open SmarterSurveys within the Blackboard interface. *Recommended option
- New Window - Will open SmarterSurveys in a new browser window.
- iFrame - Will open SmarterSurveys in a modal window within the page that the link resides.
- Select your option for Open tool in.
- Submit the form to save your selections.
Enable the Tool
- Click the down array next to the name of the registration you created in the first step.
- In the context menu, click the link for Enable
Your tool is now setup and enabled.
Creating a Detailed Module for use in Blackboard
- Log into Blackboard as a System Administrator
- Switch to the System Admin tab
- Select the link Tabs and Modules from the Communities module
- Click the button Module
- For the General Properties, enter or select the following:
- For Title, enter a name that will be used for the module. Some good examples are "End of Course Evaluations" or "SmarterSurveys Survey System".
- For Module Type, select Basic LTI tool
- For Module Category, select My Blackboard
- Select preferred options to give a user the ability to personalize and detach the module.
- For the Availability, select your preferred options for availability on where it is available and who can view it.
- To add it into the institution you need to enable System Availability
- To add it into a course, you need to enable Availability for Use on a Course Module Page
- Enable Allow Asynchronous Loading.
- You can set Date and Time Restrictions if you only what this tool available to students and/or faculty during the administration period.
- Submit the form to save your selections.
- You will be taken to the Admin page for the newly created module.
- For Content details, enter or select the following:
- For Name of existing tool, select the tool that you registered by the Setup of BasicLTI Tool section above.
- For Content URL, enter https://api.smartersurveys.com/ltimodule
- For Content Type, choose HTML
- Leave Allow launch? unchecked
- Leave Launch button? unchecked
- Submit the form to save your selections.
Once the module has been created you can include it within the Institution by default or allow instructors to include it in their courses like any other available Blackboard module. There are many options for where this link can be inserted, if it can be moved, the default location, etc. Refer to your Blackboard help for specifics on how to add a module to the location where you want it added.
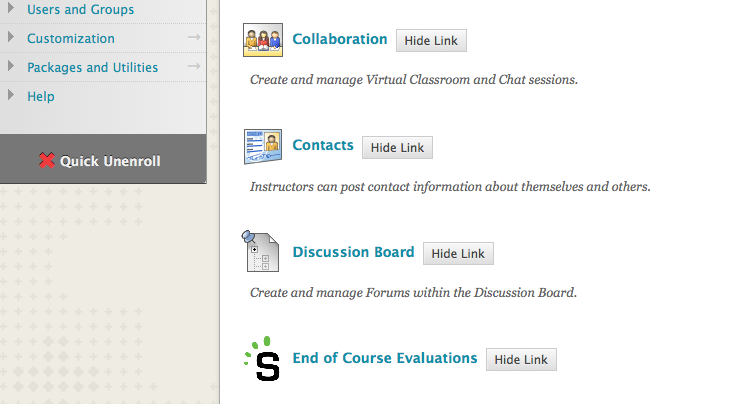
Faculty View of Detailed Module Screenshot
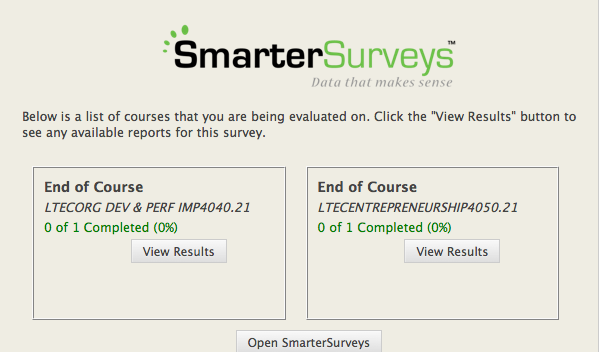
Student View of Detailed Module Screenshot
